Developing Ideas
(i) Develop design specifications, which clearly states the success criteria for the design of a solution.
By the end of year 5 students should be able to:
By the end of year 5 students should be able to:
i) What is a design specification?A specification is a set of constraints, requirements and considerations for a solution: what the solution must or must not have to be successful.
A specification is not a description of the outcome. It should demonstrate that you understand the needs of the problem that you have identified. Every aspect of a specification must be specific, measurable, achievable, realistic and testable (SMART).
The specification should be directly connected to your design brief. Writing a specification can be a difficult job if the design brief is not well researched and written. If a solution or design fails to meet an aspect of the specification, it can be considered that it has not met the criteria for success.
You will need to refer back to your specification throughout the project, particularly when developing ideas and evaluating the solution.
Changing specifications during a unit of work
A specification is not a description of the outcome. It should demonstrate that you understand the needs of the problem that you have identified. Every aspect of a specification must be specific, measurable, achievable, realistic and testable (SMART).
The specification should be directly connected to your design brief. Writing a specification can be a difficult job if the design brief is not well researched and written. If a solution or design fails to meet an aspect of the specification, it can be considered that it has not met the criteria for success.
You will need to refer back to your specification throughout the project, particularly when developing ideas and evaluating the solution.
The table below demonstrates poor and good examples of design specifications. Remember that these should be specific, measurable, achievable, realistic and testable.
| Poor examples of a design specification | Good examples of a design specification |
| My storage device must look good/nice. The interface must look attractive | The storage device must contrast with the furnishings of the room; so bright colours such as red, yellow and orange would work really well.The interface must appeal to my target audience; whose favourite colours are hot pink and deep purple. |
| It must work well. It must function correctly. | The clock must display the time accurately.The clock must have a method to hang it on the wall.The storage device must store my jewellery collection (list the specific types of jewellery and quantity) 10 rings, 5 bracelets and 10 pendants. All information on the web page must be accessible using 3 clicks or less. |
| My storage device must be the right size. | My storage device must be able to hold 20 pencils that are 170mm long and 8mm in diameter.The images on the web page must be clear and visible when viewing from 50cm from the screen. |
| My animation should be fun. | My Flash animation should contain animated graphics that carry the meaning of the song included, sing-along with bouncing dots and appropriate typography (Sassoon Primary or similar.) |
| My video must include music. | My video must include up-beat, hip-hop style music. |
| My video must not be too long. | My video must be last at least 1 minute and no more than 2 minutes. |
Changing specifications during a unit of work
You may have opportunities to develop your specification further as you continue through the unit of work.Changes in a specification should be justified through additional research that you may need to conduct as a result of finding that an aspect of a specification is not appropriate.
ii) Develop a range of feasible design ideas that can be correctly interpreted by others
By the end of year 5 students should be able to:For both digital and product design, a natural starting place when designing is with a pencil and sheet of paper, developing rough sketches of potential solutions.
You should focus on getting the basic building blocks of ideas sketched out in short, concentrated bursts.
These initial ideas should focus on generating a range of different solutions to the problem.
You should then identify which initial ideas should be developed further. This could be done through a range of strategies, including:
- further, more detailed sketches that start to develop ideas with direct reference to the specification
- detailed annotation that allows students to explore and communicate their own thinking through annotation
- making of simple card and CAD models and simulations used to test ideas and ensure they meet the specification.
Design idea development examples
 Initial sketched idea example: Animated website
The table below describes examples of strategies and techniques to communicate and develop ideas
| Technique/strategy | Digital design | Product design |
Initial concept sketching |
|
|
Development drawings |
|
|
Modelling |
|
|
Communicating and developing ideas
What does it mean to develop an idea? How do I present this information?
Designers do not come up with a single, static idea that solves all aspects of a problem; designs are developed over time in an iterative fashion. You should record your iterative development through design sketching, modelling, refining and testing. This is all part of design development.A range is not quantifiable. The number of ideas you create depends on the complexity of the problem, age, level of experience and time. When students ask how many ideas they should generate, the simple answer is: as many as it takes to solve the problem and to develop a design that meets all of the design specifications.
When developing your design ideas, you must always be working towards the goal of designing a solution to the problem, for which the requirements have been defined through the design specification.
Therefore, you must work towards developing at least one design to meet the specification.
You should develop, or refine, every detail, including:
- the exact size and shape of individual components
- the required and/or available materials
- how the components fit together to create the whole
- the required and/or available tools and equipment
- aesthetics (colour, texture, shape, form, line, balance, finish)
- how the user will interact with the solution
- aspects relating to safety and accessibility.
What is a feasible idea?
A feasible idea is an idea you could successfully make independently in the given time, with your skills, and with the resources at your disposal.You can include ideas in your design folio that do not achieve all specifications successfully, but these ideas should lead to feasible ideas through design development or be constructively criticized through annotation to highlight weaknesses and suggest improvements.
To ensure that ideas are feasible, they may need to be tested using mock-ups or models.
The following questions may help you reflect on your design ideas.
- Do I need to do more research to complete my design? For example, how do I join one part of my design to another?
- Does the school have the resources (tools, machinery, hardware, software or materials) to make the design?
- Do I have the skills to make this design? Can I gain the skills to make this design?
- Will I have to get any resources myself? If so, where and when?
- Will I be able to make this design in the time available?
Why is "annotation" important?
Annotation is vital for you to communicate the thinking behind your ideas and how that thinking develops. This is why annotation is so important. Simply sketching ideas will not clearly communicate them, as other people looking at these ideas may not interpret them correctly.Think about the following questions when writing your annotation.
- How did you come up with the idea? Did something influence your thinking?
- What materials do you think should be used, and why? Are the materials available?
- How could the idea be made? What tools, equipment and processes would you use?
- Could the design be made in the time available and with your skills?
- Would it cost too much?
- Is it safe?
- Do you think your client would like the idea?
- Why did you choose this colour/texture?
Do all ideas need to be evaluated against the specification?
When designing, you need to develop your ideas towards meeting the design specification, resulting in your final design meeting the criteria. You should constantly consider the design specifications as you design and reflect this in your annotation. An evaluation of the final design against the specification should be included as part of the design’s selection.Correct interpretation of design ideas
The correct interpretation of design ideas is vital for clear communication of ideas between a designer, client, target audience and manufacturer.You are assessed on the quality of your design communication through strand 2, encompassing your sketching, modelling, refinement, development, testing and annotation of designs. If the teacher cannot determine or interpret the design, it is not sufficiently represented and the design thinking has not been clearly articulated.
You will need to combine your design sketching, mock-ups and models, CAD and annotation to clearly articulate your ideas.
iii) Present the final chosen design and justify its selection
By the end of year 5 students should be able to:
Selecting and justifying the chosen design
When working with a client or target market, feedback is a vital source for selecting a design to take forward for prototyping. You should formulate questions, which could be delivered in the form of an interview or survey, to find out which design your client likes the best and why. You could then summarize findings in a written statement.The questions should focus on gaining feedback related to the aspects of the specification that have qualitative/subjective parameters. You should recognize that clients may change their minds at this point, and therefore the specification: you may have to redevelop your chosen idea.
You will also need to critically evaluate the chosen idea against each specification and justify how the chosen design satisfies the specification. If the design does not meet the design specification, it needs further development—or the specification needs redevelopment
Example 1
In figure 34, the student can choose to disregard design C, which meets the design specifications, and continue to develop designs B and D. Design D is developed further to meet the design specifications fully. However, design B needs much more development to meet the design specifications. Figure 34-Selecting and justifying the chosen solution
Example 2
In figure 35, the student assigns a quantitative rating of how well each design meets each of the design specifications. Design 2 seemed more likely to be chosen because it received the highest rating from peers. However, feedback from the client indicated that the design was not preferable.Designs can be further developed to improve their weak ratings against particular specifications, but when designs are developed for a particular client as opposed to a target audience, after the design has been developed to fully meet the design specifications, the client has the final choice.
| Design specifications | Incorporation of the theatre mask image | Use of colour | Simplicity of design | Overall presentation | Logo | Total score |
| Design 1 | 1 | 3 | 3 | 1 | 1 | 9 |
| Design 2 | 4 | 4 | 1 | 4 | 4 | 17 |
| Design 3 | 2 | 1 | 2 | 2 | 0 | 7 |
Evaluation of designs against specifications: Feedback from peers
The results from the table above show that design 2 received the highest overall rating (17/20) and therefore should be refined further and chosen.
| Meets design specification | Ranking |
| Excellent | 4 |
| Good | 3 |
| Slightly | 2 |
| Not at all | 1 |
Presenting the chosen design
When presenting the final chosen design, you must provide a clear image of that design, which clearly shows its details and features. This image should be presented as a final illustration, separate to any developmental work.
For product design (grade 10), students create a clear, well-presented illustration of the final chosen design that highlights details such as colour, form, texture, proportion, how the solution functions and all its features.
For digital design (grade 9), students create a clear, well-presented illustration of the final chosen design that highlights details such as colour, form, fonts, layout, how the solution is interacted with and its features.
 Figure 29-Final design presentation example: TV advertisement
Figure 30-Final design presentation example: Drawing
Figure 31-Final chosen idea examples (showing development)
By the end of year 5 students should be able to:
Why do I need a planning drawing/diagram?
Typically, designers will develop their ideas and create detailed drawings/diagrams for a manufacturer to create a final prototype/sample/model.
To get the correct solution created to the correct specification, designers must communicate their final chosen solution to a manufacturer very clearly. Planning diagrams and drawings are communication tools that are essential for good design.
To get the correct solution created to the correct specification, designers must communicate their final chosen solution to a manufacturer very clearly. Planning diagrams and drawings are communication tools that are essential for good design.
When designing solutions to problems, you need to ensure that you have a very clear idea of what you will create.
There is often a great difference between the “idea” and the “realized solution”. To ensure that the idea and realized solution are the same, you should consider all aspects of creating the product. Through the development of design ideas, you should have identified:
There is often a great difference between the “idea” and the “realized solution”. To ensure that the idea and realized solution are the same, you should consider all aspects of creating the product. Through the development of design ideas, you should have identified:
- which materials will be required (digital or tangible, standard or customized components, and so on)
- which tools and processes will be used (hardware, software, techniques and so on)
- the size, tolerances, position (layout) and assembly of components
- the overall visual appearance.
These elements must be defined clearly through planning drawings or diagrams that are sufficient for someone else to follow.
In Digital design, three key items are usable;
A. Table of requirements based on design specs/ .
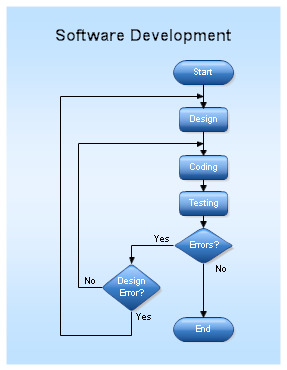
B. Flowchart Symbols
Step
|
Task
|
Requirement/ Description
|
Resources/materials
|
1.
|
Signup to Wix
|
My Culture My Choice.
|
-internet
- Wix web builder
- computer
|
2.
|
Login to Wix account
|
|
- internet
- Wix web builder
- computer
|
B. Flowchart Symbols
checkout the following link for more on flow chart. http://www.smartdraw.com/flowchart/.of interest when interacting with the site above is the a) flowchart examples and b) flowchart symbols.
Take a case example of someone developing a database to:
i) capture records of books in the library
ii) register library users
iii) handle borrowing and returning of books
.
Sample flowcharts.
1. website flowchart


Animation / Video


Games

Apps/ CookBook

Magazine
C. Sitemap/ Layout
Sitemaps on the other hand explain the layout of your project. It would explain the various tables and the interconnection among the tables in the case of a database.
It explains the various pages and how they are linked in the case of a website, and so is the case for any other application.
Take a case example of the following website:
http://www.beachcampwatamu.com/
1. Magazines


2. Website

3. Apps

4. Games


5. Magazines


6. Video/ Animation

What modes and media are appropriate for planning drawings/diagrams?
| Digital design | Product design |
|
|
Table 24-Appropriate modes and media for planning drawings/diagrams

Assembly drawing example: chair
| Parts list – Jewellery Box | ||||
| Part: | Material: | Dimensions (mm): | Quantity: | Tools: |
| Sides | Pine wood | 120 x 80 x 12 | 2 | Tenon saw |
| Front & Back | Pine wood | 180 x 80 x 12 | 2 | Tenon saw |
| Base & Lid | Pine wood | 120 x 180 x 12 | 2 | Tenon saw |
| Fabric | Blue felt | .5 Square | 1 | Scissors & glue |
| Hinges | Brass | 32 | 2 | Battery drill and Screw driver |
| Nails | Steel | 22 long | 8 | Hammer & Nail punch |
| Timber stain & Varnish | - | - | - | Cloth & Paint brush |
| Lock & Key | Brass | - | 1 | Battery drill, File & Screw driver |
| Handles | Brass | - | 2 | Battery drill, File & Screw driver |
This blog had helped me in visualizing the correct meaning of the services and analysing how iot and iot services is making the world smarter plus enhancing the business opportunities.
ReplyDeleteAs we know, Big data solutions developer is the future of the industries these days, this article helps me to figure out which language I need to learn to pursue the future in this field.
ReplyDelete